Pneumatic control valves play a crucial role in regulating process flow in industrial automation systems. However, due to complex operating environments and mechanical-electrical-pneumatic interactions, various faults may occur. This guide summarizes four common categories of failure, their causes, and practical troubleshooting methods.
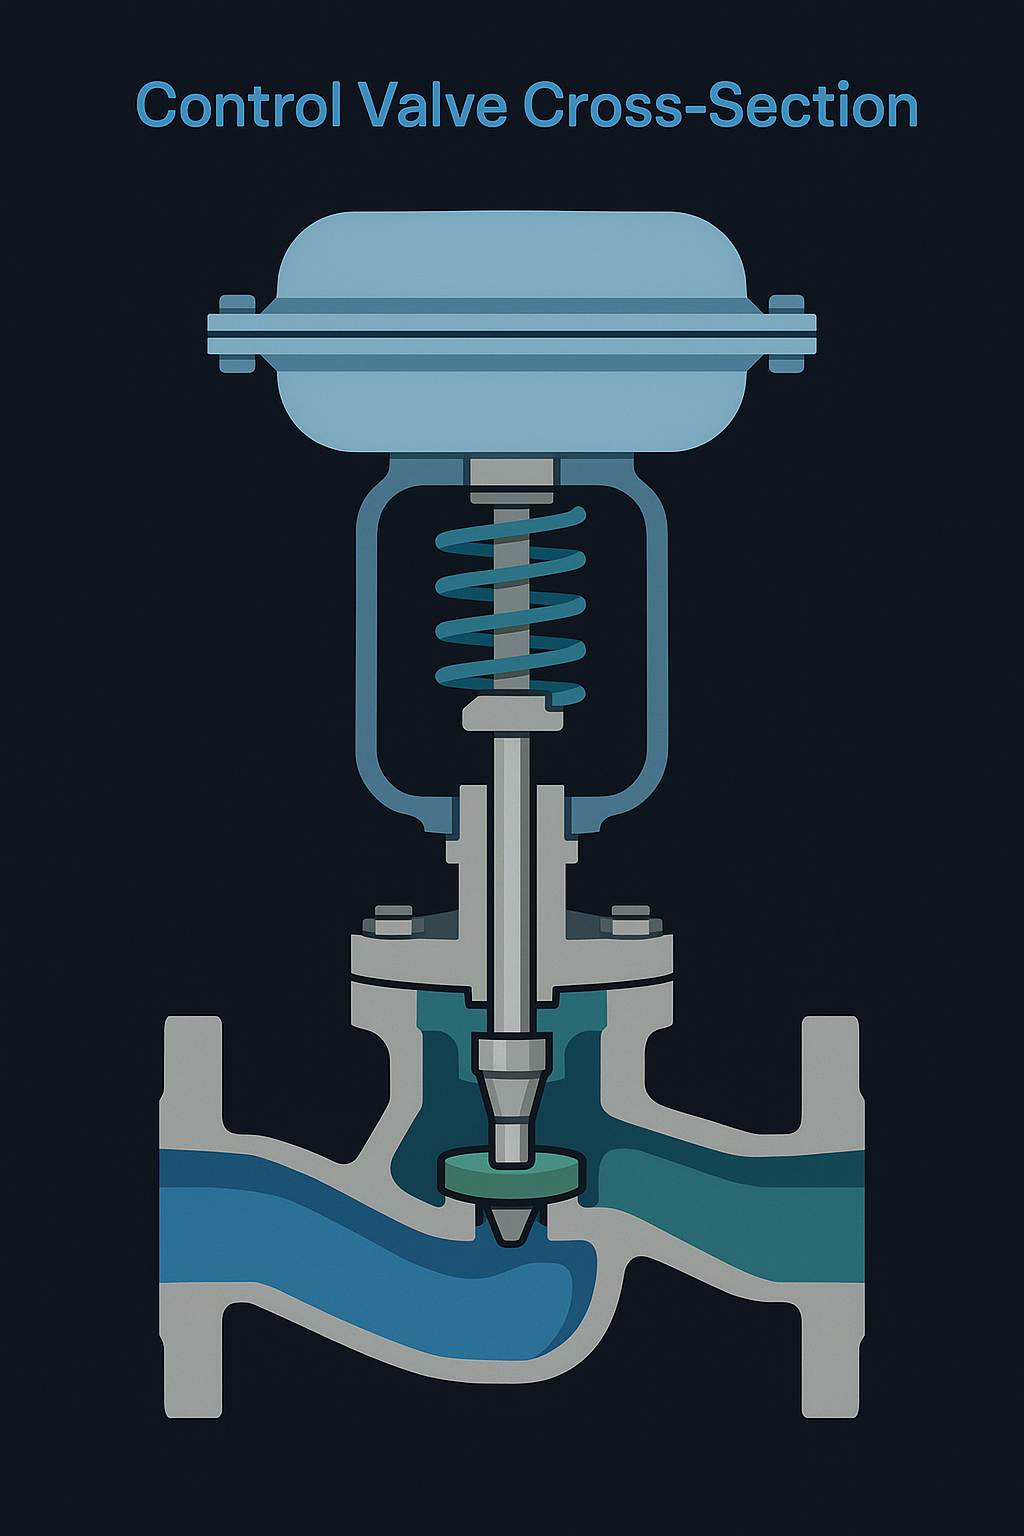
1. Valve Fails to Actuate
Typical Symptoms: Valve does not respond to control signals.
Possible Causes:
Inadequate or interrupted air supply.
No output from I/P converter or positioner.
Diaphragm rupture inside actuator.
Sticking between valve plug and seat.
Troubleshooting Steps:
Air Supply Check Ensure inlet pressure meets valve requirements (typically 0.4–0.6 MPa); inspect for blockage or leakage.
Signal & Positioner Measure input signal (e.g. 4–20 mA). If positioner has no output, recalibrate or replace it.
Actuator Diaphragm Dismantle actuator and inspect diaphragm. Replace if ruptured or aged.
Valve Plug & Seat Close inlet/outlet block valves, disassemble the trim, clean debris, and polish seating surfaces if needed.
2. Unstable Operation (Oscillation, Stick-Slip)
Typical Symptoms: Valve vibrates, responds sluggishly, or overshoots.
Possible Causes:
Fluctuating air pressure.
Improper positioner gain or tuning.
Poor lubrication between stem and guide bushing.
Foreign particles stuck in valve body.
Troubleshooting Steps:
Stabilize Air Pressure Install a precision air regulator before the valve.
Retune Positioner Lower gain or adjust PID parameters to avoid hunting or overshoot.
Lubricate Guide Apply silicone-based grease to valve stem and bushing.
Clean Internals Flush valve body and install upstream filter if particles are frequent.
3. Leakage (Internal / External)
3.1 Internal Leakage
Symptoms: Valve is fully closed, but medium still flows.
Causes:
Damaged or worn sealing surface (plug/seat).
Dirt or debris on sealing surface.
Positioner zero offset – valve not fully closed.
Solutions:
Grind or replace trim: Restore plug/seat sealing surface.
Replace packing: Use proper graphite or PTFE packing and compress layer-by-layer.
Tighten bolts: Evenly torque gland bolts to prevent misalignment.
Change gasket: Replace damaged gasket and retighten flange bolts using cross-tightening method.
4. Poor Control Accuracy
Symptoms: Valve cannot hold setpoint; process value fluctuates.
Possible Causes:
Inaccurate or degraded positioner.
Plug wear changes flow characteristics.
Damper failure (if equipped).
Signal interference (EMC issue).
Troubleshooting Steps:
Upgrade Positioner Use high-accuracy smart positioner; recalibrate.
Inspect Trim Wear Replace plug if wear affects flow coefficient.
Damper Check Refill damping oil or replace damper assembly.
Shield Signal Cable Ensure twisted-pair shielded cables are grounded to reduce EMI.
Preventive Recommendations
Inspection Item
Frequency
Action
Air supply pressure
Weekly
Check regulator stability
Positioner calibration
Monthly
Test signal response
Stem lubrication
Quarterly
Reapply approved grease
Packing tightness
Quarterly
Inspect for leaks and re-torque if needed
Gasket condition
Shutdown basis
Replace during major overhauls
Conclusion
Effective maintenance and quick diagnosis of pneumatic control valve issues can significantly improve process stability and reduce downtime. By following the above troubleshooting steps and preventive measures, maintenance personnel can address most operational faults in a timely manner.