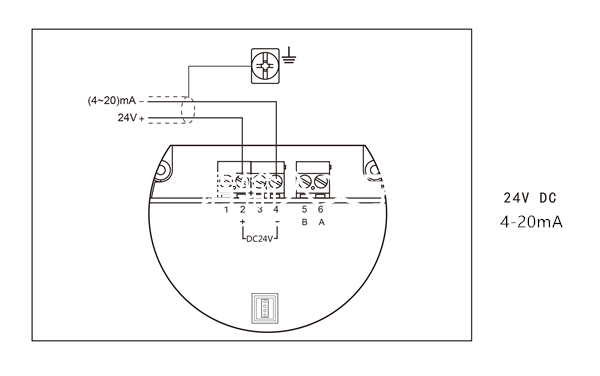
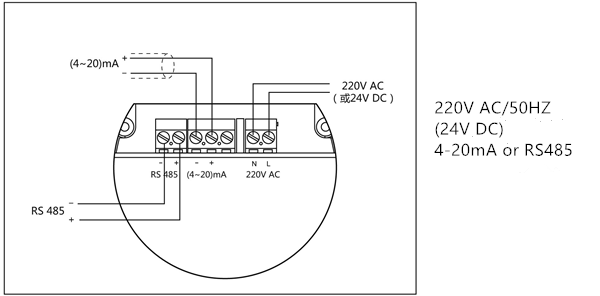
As radar level meter is more and more chosen by users, many technical problems come along. Many users have issued soul-crushing questions, such as how to install the radar level meter? And how to wiring? Before I wrote the radar level meter installation method, so today we will talk about how to wire.

The radar level meter works by transmitting and receiving very short microwave pulses of very low energy through an antenna system. The radar wave travels at the speed of light.
The operation time can be converted into a level signal by means of electronic components. A special time-stretching method ensures stable and accurate measurements within a very short time.
Even in the case of complex conditions and spurious echoes, the level echoes can be accurately analyzed using microprocessor technology and debugging software.
A radar level meter with low beam energy can be installed in various metal and non-metal vessels or pipes for non-contact continuous level measurement of liquids, slurries, and granular materials. It is suitable for dust, temperature and pressure variations, and the presence of inert gas and steam.

Before we talk about how to wire the device, let’s get some information. First of all, we must know that there are two types of power supply voltages for radar level meters, one is DC and one is AC. Then care must be taken to confirm the nameplate, label, and certification level of the equipment before wiring, prepare shielded twisted-pair cable, and possibly separate cable and conductor tubes.
The following will ask you to introduce the wiring method of the radar level meter. First, you need to loosen the locking bolt with a 2mm hexagonal screwdriver and screw open the cover with a screwdriver or rod.
Then peel off about 70mm of cable skin from the end of the cable and thread it into the case through the inlet.
Next terminal wiring, the polarity has been marked on the terminal block, be sure to watch it, then ground according to local regulations, and finally screw the connector to ensure sealing.
